1. Overview
In Fedena, Elective Groups are used to group subjects from which students can choose one or more subjects based on the institution's academic requirements.
A Floating Subject allows subjects to be available across different groups, depending on the configuration. This provides flexibility when a subject needs to be associated with more than one group.
2. Creating an Elective Group
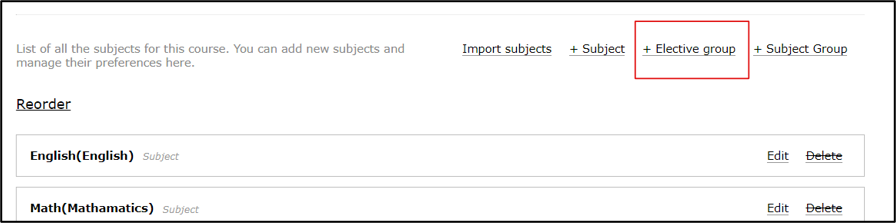
Step 1: Open Elective Group
Click on + Elective Group.
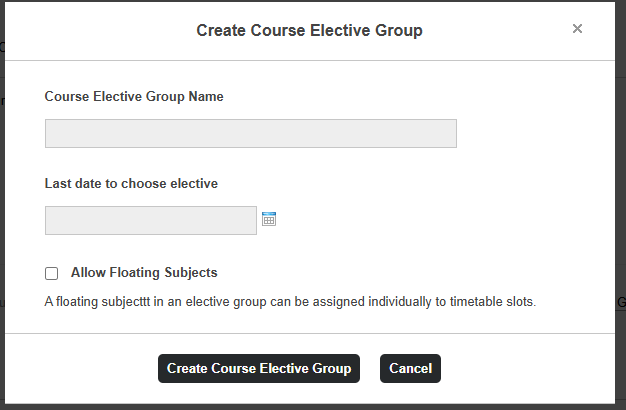
Step 2: Enter the Elective Group Name
Enter the Course Elective Group Name.
For example:
Elective Group Name: Language Electives
Step 3: Select Floating Subject Option
Select whether Floating Subjects are allowed or not.
This option determines whether subjects can be configured as floating subjects within the elective group.
Step 4: Create the Elective Group
Click on Create Course Elective Group.
Once the elective group is created, you can add the required subjects to the respective elective group.
Step 5: If the Grading System Type selected for the course is GPA, an additional field called:
Last Date to Choose Elective
will be available while creating the subject.
This date defines the deadline for selecting the elective subject.
Students should complete their elective selection within the configured time period.

3. Understanding Floating Subjects
A Floating Subject provides additional flexibility while configuring subjects within elective groups.
When creating an elective group, the administrator can choose whether floating subjects are allowed.
Example :
Suppose an institution has the following elective subjects:
- French
- German
- Spanish
If floating subjects are enabled, the subjects can be configured with additional flexibility based on the course and elective group requirements.
The exact availability and selection behavior depends on how the elective groups and subjects are configured in the course.
Important: Based on the information shared, floating subjects are controlled through the “Allow Floating Subjects” option while creating the Course Elective Group.
4. Creating a Subject Group
A Subject Group can be used to organize multiple subjects or elective groups.
Step 1: Open Subject Group
Click on + Subject Group.
Step 2: Enter the Subject Group Details
Enter the Subject Group Name.
Select whether the Subject Group Score needs to be calculated.
Step 3: Create the Subject Group
Click on Create Subject Group.
After creating the Subject Group, you can add:
- Subjects
- Elective Groups
to the respective Subject Group.
5. Relationship Between Subjects, Elective Groups and Subject Groups
The configuration can be understood as follows:
Subjects → Elective Groups → Subject Groups
Subjects
Individual academic subjects.
Elective Groups
A collection of subjects from which students can make elective selections.
Subject Groups
A higher-level grouping that can contain:
- Individual subjects
- Elective groups
This structure helps institutions organize subjects according to their academic and grading requirements.
6. Editing Subjects, Subject Groups and Elective Groups
The Edit option provides flexibility to modify the details of existing:
- Subjects
- Subject Groups
- Elective Groups
Step 1: Click Edit for the required Subject, Subject Group, or Elective Group.
Step 2: Modify the required details.
Step 3: Click the respective update option:
- Update Subject
- Update Course Elective Group
- Update Course Subject Group
7. Deleting Subjects, Subject Groups and Elective Groups
The Delete option can be used to remove unwanted:
- Subjects
- Subject Groups
- Elective Groups
Step 1: Click the Delete option.
Step 2: Click the Delete button available in the confirmation popup.
Important Note
If a subject is already being used in another module, it cannot be deleted.
Therefore, before deleting a subject, ensure that it is not linked or used elsewhere in the system.
Was this article helpful?
That’s Great!
Thank you for your feedback
Sorry! We couldn't be helpful
Thank you for your feedback
Feedback sent
We appreciate your effort and will try to fix the article