Add Normal subjects to a batch:
To add a normal subject to a batch, you must either be the administrator or a privileged employee (Manage Course/Batch or Subject master privilege must be is provided). A normal subject is a mandatory subject that must be completed in order to meet the requirements of a course. Normal subjects are applicable to all students in the batch.
If you are not importing subjects from the previous batch, you will have to add new subjects for the batch. You can add normal subjects using the following methods.
Through the Manage Course or Manage Batch page-
At the top of your dashboard, click the Menu > Administration > Settings > Manage Course/Batch > Manage Course to open the Manage Course page.
OR
At the top of your dashboard, click the Menu > Administration > Settings > Manage Course/Batch > Manage Batch to open the Manage Batch page.
Select the Course. All batches of the selected course are displayed.
Select the batch.
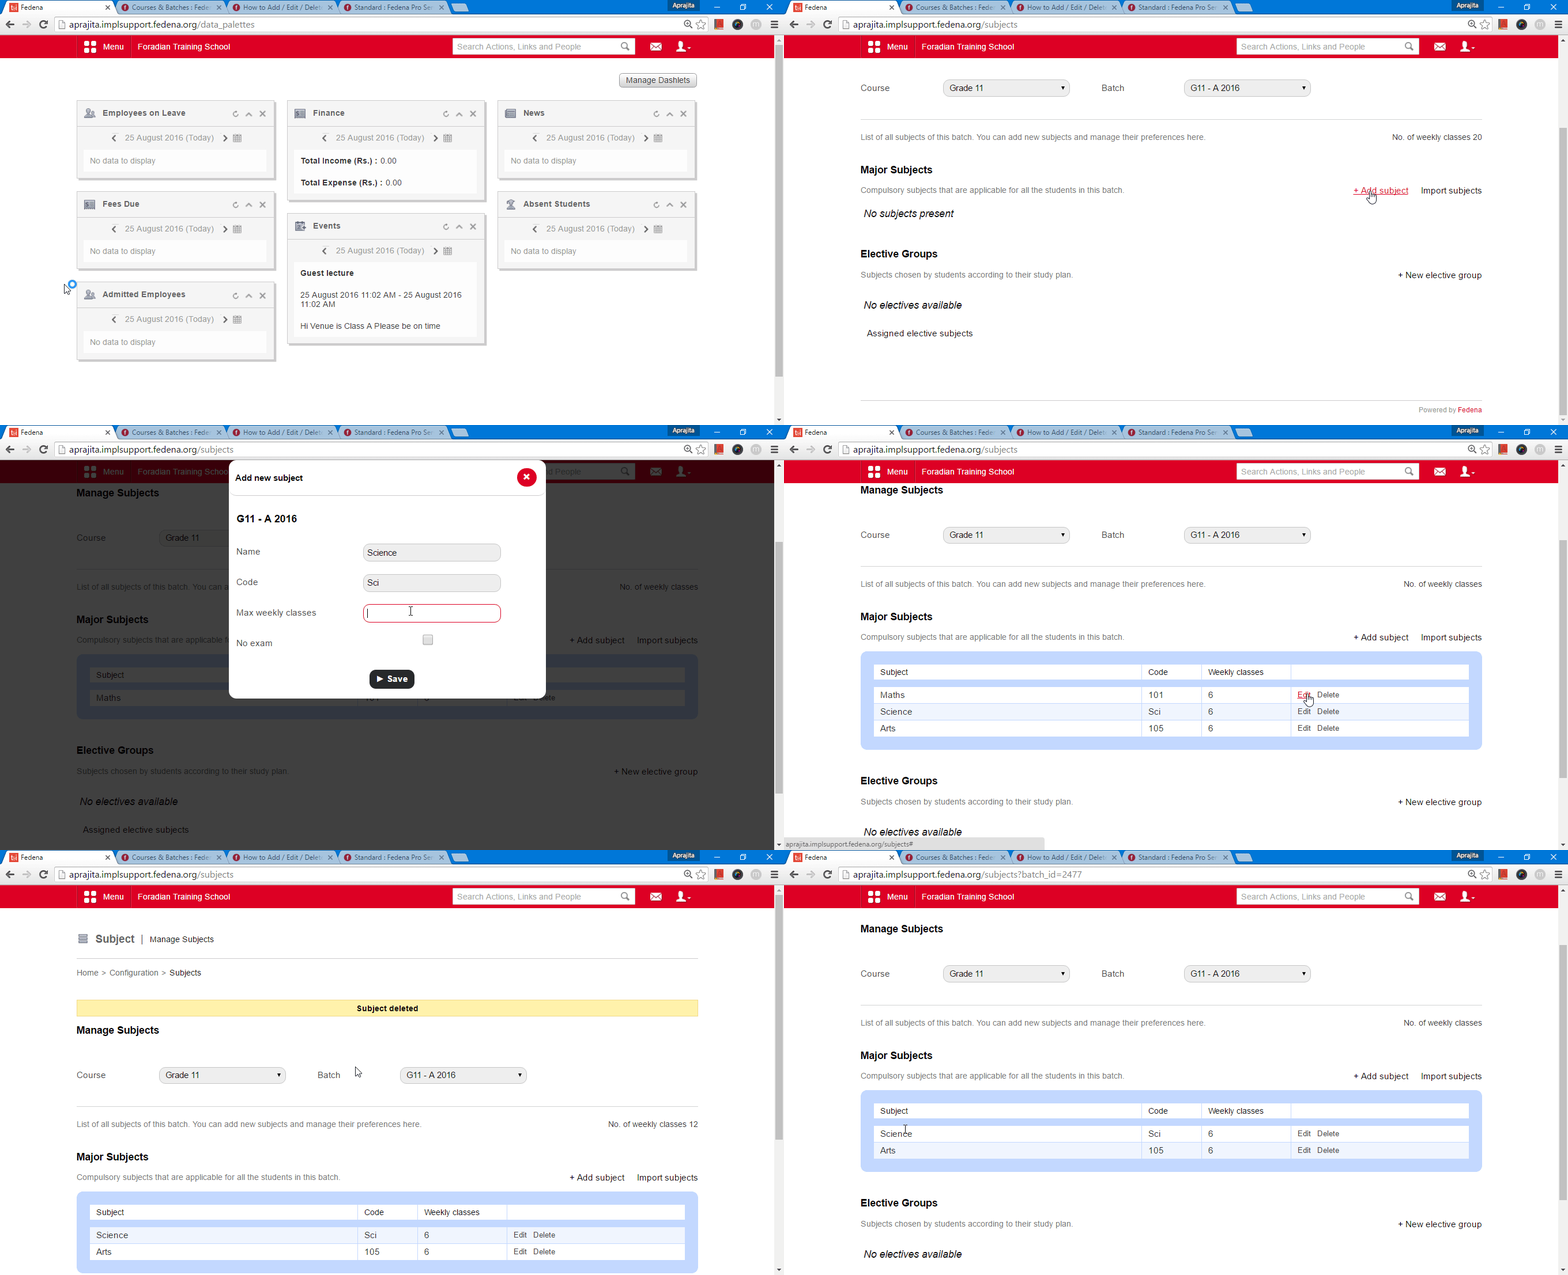
In the top right, click Manage > Subject to open the Assign Subject page as depicted in figure Fig1.
Fig 1.
Click the Add Normal subject link as shown in Fig 2.
 Fig 2.
Fig 3.
In the Name field, enter the subject name.
In the Code field, enter the subject code.
In the Max weekly classes field, enter the maximum number of classes that the subject can be taught in a week.
In the Credit Hours field, enter the number of credit hours for the subject.
Note: This field is available only when the grading system for the course is GPA or CWA.
Select the No exam checkbox if no exams will be conducted for the subject.
Click the Save button.
At the top of your dashboard, click the module access icon > Administration > Settings > Manage Subject to open the Subjects page.
1. Select the batch for which you want to add a normal subject, on the right top, click Add Normal Subject as depicted in Fig 4.
Fig 4.
Fig 5.
2. In the Name field, enter the subject name.
3. In the Code field, enter the subject code.
4. In the Max weekly classes field, enter the maximum number of classes that the subject can be through in a week.
5. In the Credit Hours field, enter the number of credit hours for the subject.
Note: This field is available only when the grading system for the course is GPA or CWA.
6. Select the No exam checkbox if no exams will be conducted for the subject.
7. Click the Save button.
Fig 6.
Edit Normal subjects to a batch:
Normal subject added once can be edited through the Subjects page.
At the top of your dashboard, click the module access icon > Administration > Settings > Manage Course/Batch > Manage Subject to open the Subjects page.
Select the batch. All subjects associated with the batch are displayed.
Click Edit beside the subject you want to edit.
.png?1465300145)
Fig 7.Make the necessary changes, and then click the Save button.
To delete a normal subject, you must either be the administrator or a privileged employee (Manage Course/Batch or Subject master privilege must be is provided).
The normal subject can be deleted only if the exam schedule has not been published for the subject. You can delete a normal subject through the Subjects page.
At the top of your dashboard, click the module access icon > Administration > Settings > Manage Course/Batch > Manage Subject to open the Subjects page.
Select the batch. All subjects associated with the batch are displayed.
-
Click Delete beside the subject you want to delete.
Fig 8..png?1465300398)
Click OK to confirm.

Was this article helpful?
That’s Great!
Thank you for your feedback
Sorry! We couldn't be helpful
Thank you for your feedback
Feedback sent
We appreciate your effort and will try to fix the article